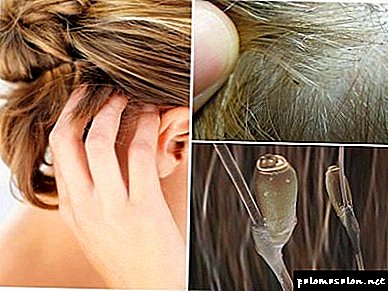
Today, many beautiful hairpins are sold, but they are often short-lived. One gets the impression that these barrettes are disposable. Sometimes it seems that it would be better to do hair clips with their own handsthan with a sinking heart listen to what is happening on the head, if you can not look in the mirror and make sure that the decoration is in place.
A bow with luxurious white laces can be disposable - for a first grader, as if the girl, besides the first call, will never have matinees at school again! The hairpin with the most beautiful flowers is for the bride, because the wedding most often happens only once in a lifetime. What then is the second day? And the first day of such an intense and eventful event, some barrettes are not able to survive!

Flowers lose their petals, just like Mr. X's sings. And sometimes all the massive decoration is completely broken from its base, as if it has long dreamed of throwing itself into the abyss. In fact, all these flowers and bows are simply made without a soul. And when you make something for yourself or for a daughter, niece, granddaughter, then you will do everything reliably. And there will be such a decoration to serve as long as the grandmother's “vintage” comb, which her grown-up granddaughter can adapt to her retro look!
The question of what materials to use is not urgent now. Even before, some needlewomen had never thrown a hair pin, if that one had a boring plastic plate from a perfectly working mechanism. It was simply taken as a basis, and the decoration was made: some of beads, some of ribbons, some of clay or salt dough.
Today, the basis of automatic hairpins can be purchased separately. These blanks are sold in stores of goods for needlework. There you can also buy ear hooks, clasps for beads and bracelets, the basis of the pendant for pendants. So having made a beautiful hairpin, you can then create a set of other decorations for her. After all, even jewelers have not yet come up with a set of their bracelets, rings, brooches and earrings to make jewelry for the hair!
Other materials for creativity can be:
However, if your imagination goes further, you can adapt something else to the work.
Options and technology
Self-made hairpins attract attention - they practically do not differ from the purchased models, but have the personality of their own mistress. The manufacturing process does not require special equipment or skills. In the hardware stores you can buy almost everything for such crafts.
Variations of jewelry for hairstyles with their own hands - a great many. It can be:
- polymer clay hairpins,
- hair pins for greek hair
- hair ornaments made of satin ribbons
- gum on which the ribbon is beautifully attached and much more.
It is extremely simple to make each of the declared jewelry with his own hands, but there are several important nuances:
- Before you begin, you need to prepare the workplace.
- Selected materials must be of sufficient quality.
- If there is a need to sew in the process, then the thread should be strong.
- The colors of the materials should be harmoniously combined.
For the manufacture of gum, or as hairpins, you can choose any material, but it is better to purchase tapes with finished edges - then you will not have to think about how and what to brush over the edges. A variety of material is to like the very needlewoman. For such homemade products fit all types - from velvet to light chiffon.
Due to the abundance of variations, it is not possible to mention everything. However, it is worth dividing them into two broad categories:
- children's decorations,
- hairpins for adults.
Before starting work, it is necessary to decide who will use the product and take age into consideration when choosing a style.
When the goal is a children's elastic band with ribbons, or kanzashi on the hair clip, the colors of the ribbons should be bright. When making jewelry for more adult girls, it is worthwhile to give preference to more restrained tones and try not to overdo it with your own hands in a big way of decorating.

Hair accessories from fabric tapes
It is not always possible to go to the hardware store and purchase tapes, but here there will be cuts of fabric in the bins of any hostess. Moreover, most often these scraps simply have nowhere to put. And so - and the material will not lie down for nothing, and a stylish decoration will replenish the box with the little things that are dear to your heart. In order to make a clip of fabric ribbons with your own hands you need:
- two types of fabric
- threads and needles
- bead,
- base - automatic, clamp,
- Superglue (glue gun).
The creative process looks like this:
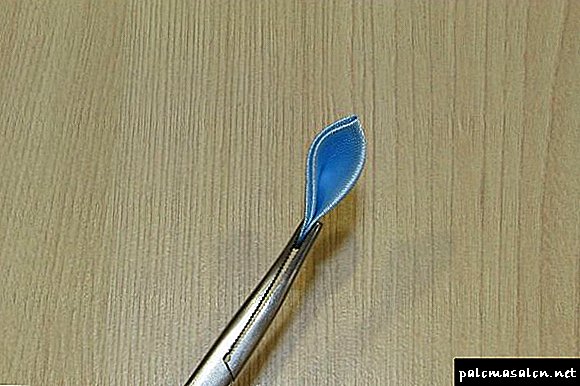
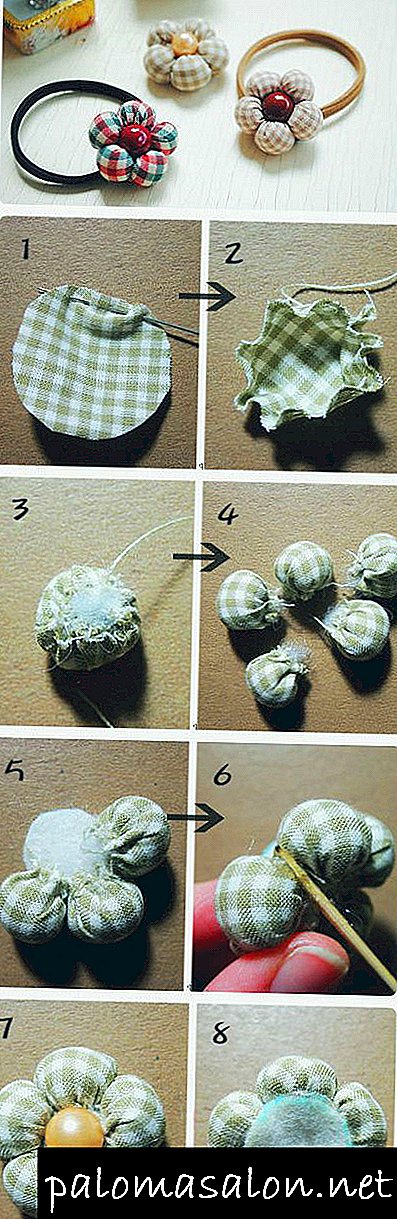
- It is required to cut one of the fabrics into ribbons 5 cm wide, the other into 2.5 cm wide ribbons.
- We divide a tape from the main fabric into 5 pieces 7 cm long.
- Each of the cuts is folded at an angle of 900, the distance of the corner from the edges is the same.
- The result is a petal that is held together by a thread; four more petals are executed according to the algorithm.
- The same procedure should be repeated for the second type of fabric.
- The resulting petals are stitched together - it turns out two flowers of different diameters.
- A smaller flower is embedded in the middle of a larger one and fixed there.
- In the center of a double kanzashi flower is sewn, or a bead is glued.
- The resulting composition is fixed to the base.
A master class on making such hairpins can be found on the Internet - both in the video version and in the form of step-by-step photos. But even without viewing additional training photos and videos, there will be no difficulty in making such an accessory.
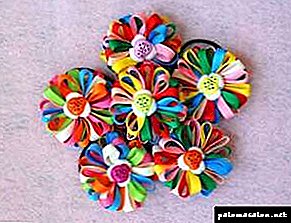
Hairpins from satin ribbons
It is better to make your first homemade hair accessory from satin ribbons, bought earlier in a fitting store. Photos will help to understand how this decoration will look like.
You can view pictures of finished products, pick up the one you like and make it yourself.
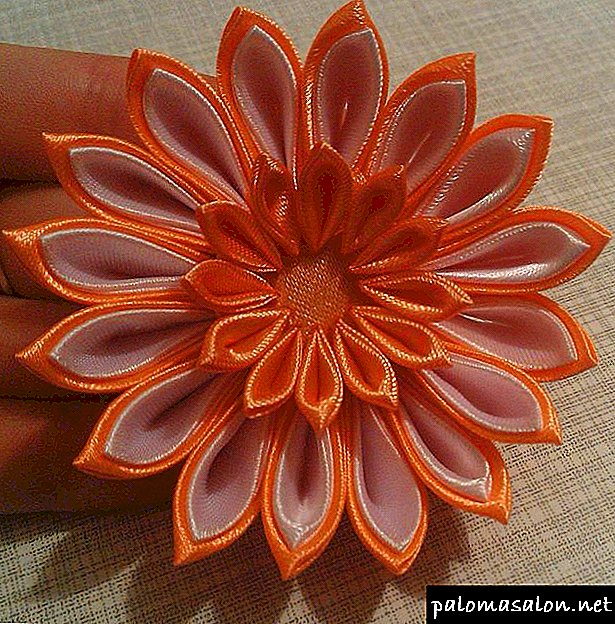
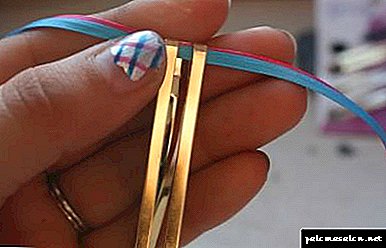
Now popular hairpins of satin ribbons, made in the technique of tsumami kanzashi. After the main element of decoration is made - a flower made of ribbons, it is fixed on the base - a clip, an elastic band, or a hairpin. In order to make jewelry in your hair, you need the following list of materials:
- Satin ribbons - 3 colors, width 5 cm and two by 2.5 cm. Each half meter.
- Fastening the base for the future of the flower (hairpin, clip, gum).
- Sewing kit - threads, needles, scissors.
- To fix the flower on the base, it is desirable to have a glue gun.
Each of the tapes is cut into squares - only fifteen pieces of each type. The number can vary - if you want more or less petals in one flower. It is better to process the raw edges of the squares - heat the blade of the knife and carefully solder the edges. The preparatory stage at this end and begins building hairpins.
Nuance! It is possible to use a cigarette lighter (preferably autogenous) or a candle for processing the ribbon cuts. But soldering with a knife gives a more accurate result.
A square of wide tape is formed so that an acute angle is obtained. To do this, bend the two corners on both sides. Further, it is fixed with the help of a thread and a petal of the desired shape is formed, its shape is corrected by tensioning the thread. All remaining squares from a wide ribbon are processed in a similar way. Stitched together. The actions are repeated for the other two tapes.
The resulting flowers are nested in each other and fixed with a stitch or with a glue gun. In the core of the resulting multi-tiered flower arrangement, you can sew a bead - at the request of a needlewoman. The kanzashi flower is attached to the base. The number of such colors of kanzashi can be more - it all depends on the fantasy and desires of the skilled worker.

How to make petals of a different format
“Kanzashi” are flowers with sharp petals, and if you need large petals with rounded edges, like a peony halo, you can cut pieces of thin fabric in the form of circles, thread the thread, sweep over the edges, and pull them off. Get a round petal volume. They can be made several - for different rows. As the middle of such a flower, a pearl bead is perfect, because it perfectly combines with such a delicate form of petals.

This flower will be decorated with stamens. They can be made from strings or strings. The tips of the line can be bent loop or tie a knot. On the string you can wind a thin wire from one end. These thickened tips should be dipped in nail polish with glitter. When the stamens are ready, they need to be fixed between the petals with hot melt so that they do not fall off, but also so that the attachment point is not visible.
The second option, how to make the stamens with your own hands, is to strung beads on a fishing line or string, after having dipped the end of it into the melted hot melt glue. It is necessary to ensure that the bead remains on the end of the stamen until it solidifies.
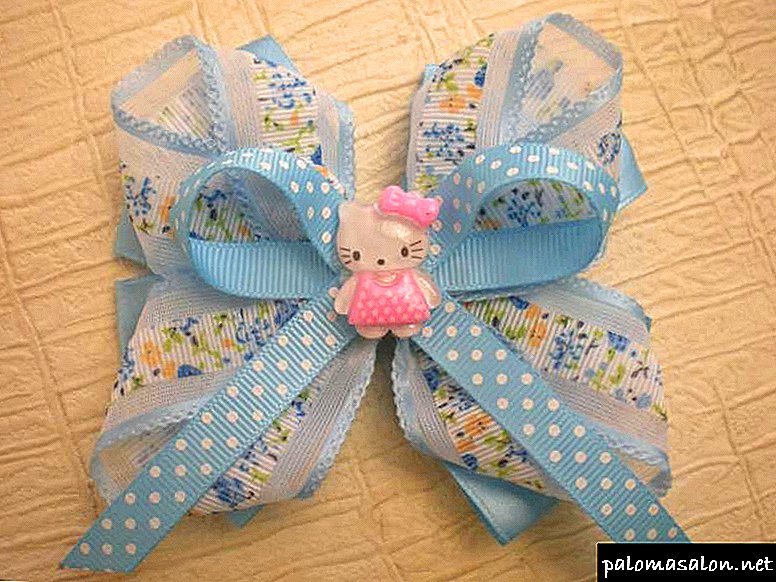
How to make a hairpin bow

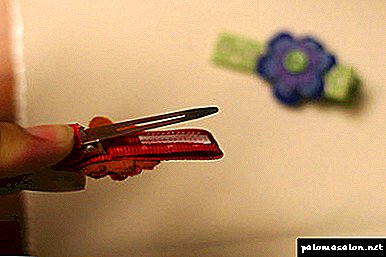
The simplest version of the bow hairpin will be a thing made of two parts. To do this, you can take the basis of an automatic hairpin and the old father's bow tie, which was not tied, but was already molded and worn on an elastic band. From him, you need to take only a butterfly and glue it with a hot glue from a pistol to the pin of a machine gun.
Lace, sewn on the narrow sides, as well as a vintage button sewn in the middle, can add additional charm to this bow tie. Even if this button has a broken ear, its remnants can be bitten off with a nipper and put it on hot melt glue after sanding its back side. If there is no sandpaper, then this operation can be done with a nail file or a file.
You can make one big hairpin-bow, embroidering it with beads, and you can make “kids” hairpins from a similar fabric to it, that is, the same ones, but in miniature. They can be put on stealth or spring barrette. So get a charming set.
There are many ways how to make hairpins with your own hands, and for this it is not necessary to take an automatic basis. Handmade flowers can be decorated with a crab barrette. Such a hairpin with a pair of identical colors glued symmetrically looks very good.
From foamirana

To decorate an old shabby hairpin with foamiran flowers, you will need:
- Foamiran white and green flowers
- harvesting stamens
- pastel blue, blue and purple,
- an old barrette or mount from a barrette,
- scissors and stationery knife,
- wooden skewer
- pencil,
- ruler,
- iron,
- glue gun,
- brush.
First you need to make two stencils for petals and leaves. Draw a rectangle of 2 cm by 2.5 cm on the cardboard and trace the outline of the petal on it, as shown in the photo.

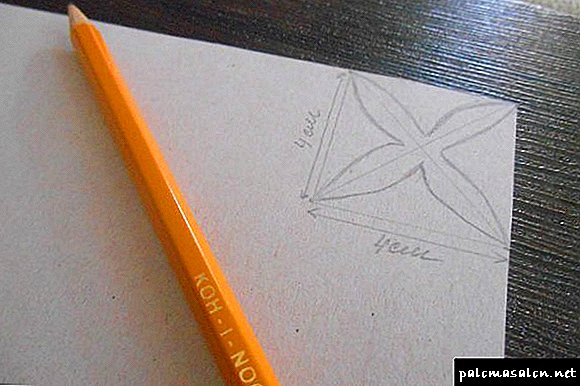
Then draw a square with a side of 4 cm and diagonals that will become guides for the leaf petals. Draw a sheet template in the same way as in the photo. And cut.
Stencils made of cardboard with a wooden skewer circle on the foamiran, petals are on white, and the leaves are green and cut. To create three flowers you will need six flower petals and one leaf blank.

Of course, to create colors you can take foamiran sheets of different shades, but in this master class we offer to paint it yourself in the desired color. For this you need pastel. Take the blue, blue and purple pastels and crumble it with a clerical knife.

Lightly moistened brush, dip it in pastel and rub it with the petals on both sides. If desired, this can be done with your fingers. The main thing is that before changing the color of the pastels, it is good to wash out the brush and hands.

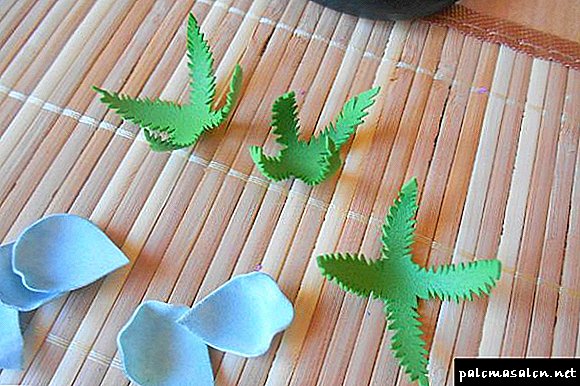
In addition to the harvested green leaves, you need to cut a few more sheets that will be attached under the flowers and will help close the clip bar. Their shape can be arbitrary, and on the sides you need to make several small cuts.


After tinting the petals should be shaped. To do this, heat the iron to medium temperature and alternately apply petals to the iron for a few seconds. Then placing the heated petal on the palm, press on its center with your finger and pull it down a little.
This action will help to make the petals more voluminous, and their edges - embossed.

The green leaves in contact with the iron will also take the desired shape. Additionally, they can be twisted in the palms or rolled into flagella.

For each flower will need two blanks stamens. Fasten them together with a glue gun.

Then gently connect the first petal with the stamens as shown in the photo.

Consistently glue all the petals in a circle so that there are no large gaps between them. Apply glue is necessary strictly on the edge of the petal, then the flower turned out more voluminous. Using this method, collect three flowers.

In order for the leaves to stick tightly to the base of the flowers, the protruding ends of the stamens need to be cut.

Now go to the design of hairpins. First glue all the green leaves on it, carefully hiding the entire surface of the barrette.

Then place the flowers on the barrette, one exactly in the center, the rest on the sides tilted.
From satin ribbons and flowers

To create a delicate elegant hair clip from artificial flowers and ribbons you will need:
- sprig of roses and Ruscus or any small flowers and greens,
To create a base for a hairpin, cut a small strip from the cardboard, bend it in half and add invisibility to it as shown in the photo. Glue the resulting construction with hot glue. 
Fold the tape in a loop and fix with glue. Next, form a second loop from the ribbon and secure it with glue over the first one by sliding it slightly obliquely. Then continue to fold the loops in a similar way until you have a full circle. Cut off the rest of the tape.
Glue the resulting bow to a cardboard base with stealth. 
Using the pruning shears, cut the stems right under the head of the flower, and divide the greens into separate leaves. First try on how to place the flowers on the base, and then, abundantly applying glue to the base of each element, begin to attach flowers and leaves to the hair pin. 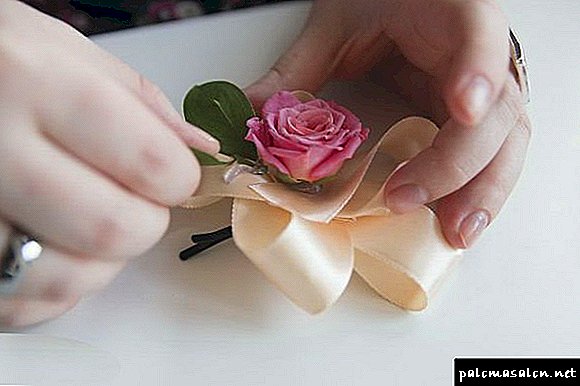
Polymer clay

To create a set of stylish autumn ornaments made of polymer clay, you must take:
- polymer clay of red, orange, yellow, dark yellow colors,
- stencil for polymer clay,
- brown beads,
- fishing line 3 mm
- chain and clasp for bracelet,
- crocodile hair clips - 2 pieces,
- Super glue,
- brush,
- scissors,
- toothpick
- acrylic lacquer.
The set will consist of a bracelet and two hairpins, decorated with bunches of mountain ash and bright autumn leaves.
Therefore, to begin to make berries of mountain ash. Take a small piece of red polymer clay and divide it into several equal parts.
Mash the clay in your hands to make it plastic and roll it into a ball. 
Using a toothpick, pierce the future berry through to create mounting holes. At the entrance of the resulting hole, using light pressure with a toothpick, make small groove characteristic of rowan.For decorations you need about 50 of these berries.
For the manufacture of autumn leaves, take a little clay of each color. 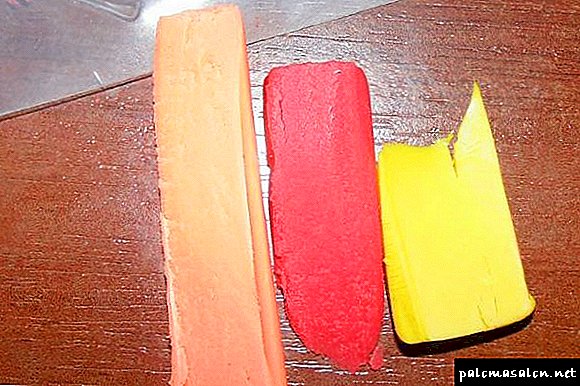
Mash it well and mix together. 
Cut the required amount of clay for one sheet and firmly fill it with a special stencil. If you do not have such a stencil, roll a piece of clay and give it a form of a sheet yourself. To create an invoice, you can use a live or artificial sheet, attaching it to the blank to print the veins. 
Remove the sheet from the stencil should be very careful, as it is quite thin and can be deformed or torn.
Make several sheets of different shapes and sizes. At the base of each workpiece with a toothpick, make through holes for mounting.
Next, put all the prepared items in the baking dish and send it to the oven for baking for 15-30 minutes at a temperature not higher than 130 degrees. 
When the specified time is out, take the items out of the oven, let them cool and cover with several layers of acrylic lacquer. At this stage, the blanks will gain strength and brilliance. 
Now we proceed to the assembly of the bracelet and pins. For the bracelet, take the chain to the size of the hand and attach the lock to the extreme links.

Begin to collect decoration items according to the diagram below.

Type six beads on the line, then a rowan berry and another bead, and return the same edge of the line back the same way. Tighten the line, you got the first twig. Similarly, weave the remaining six branches and connect them with leaves.

Unclench the link of the bracelet and put the first decoration on it.

Then make another 4-5 similar jewelry and attach them to the bracelet.
Now, using superglue, glue the largest leaves to the hairpins, and on top of the sheet, attach a bunch of berries, collected according to the scheme attached above. Just pay attention, we increased the number of twigs with berries.

In conclusion, add hairpins with the remaining small leaves.

From tapes gro-gro
These hairpins were popular in the days of disco. To make such a retrozakolku need:
- metal oblong hairpins with a length of not less than 5 cm,
- gro-gro tape up to 4 mm wide,
- gun-glue (with hot glue).
Cut approximately 60-65 cm of ribbon. Fold in half. Attach the center of the ribbon to the base of the barrette, then stretch one of the edges through the middle, repeat the same with the second end.

Do this alternation to the end of the barrette, wrapping it with a ribbon.

Reaching the end, tie a knot.
The tail of the tape must be twisted into a tight bundle.

Apply a drop of glue to the base of the hairpin, wind the remnants of the tape-bundle, forming a dense flower.
In kanzashi technique

To decorate a bow hairpin using the kanzashi technique, prepare:
- satin ribbon 5 cm wide,
- a candle or a lighter,
- scissors,
- tweezers,
- Super glue,
- rhinestones and beads,
- a piece of felt
- a hairpin,
- feathers.
For a start, cut 14 squares with a side of 5 centimeters out of a ribbon. This number of petals is enough to form a single flower.

Each square bend diagonally.

The resulting triangle again bend in half.

And once again in half.
Make sure that the folds on each petal are performed in the same direction. The irregular corner of the product should be cut a little, and then sing it over the flame of the candle and squeeze with tweezers so that all layers of the tape are connected.

Cut off the back of the resulting petal at an angle of 25 degrees as shown in the photo. And singe too.

It should be such a petal:
During the work, be sure to try to scorch all the tape slices so that it does not roll. Otherwise, the product will quickly lose its appearance.
To the seven petals paste the beads as in the photo.  These petals will be located in the first row of the flower.
From a piece of felt cut a circle with a diameter of 4 centimeters. On this basis a flower will be collected.

Now in a circle we apply feathers to the felt base and fix them with glue. Pre-feathers should be sorted by size and shape, if necessary, cut or straighten.

Glue the seven petals with beads over the feathers in a circle. For greater reliability, first, the petals can be strung on a thread and pulled together in the shape of a flower, and the top can be pasted.

Mount the second row of petals in the gaps between the petals of the first row.
Decorate the center of the flower with rhinestones, and glue the clip on the reverse side to the felt.
Acrylic Coated
For such hairpins you need:
- set of metal hairpins,
- fine brushes,
- acrylic paints,
- cardboard cut,
- art varnish.
To begin with, fasten the hairpins on the cardboard. So it will be more convenient to decorate them.
Squeeze the required amount of acrylic paints onto the palette.
Apply the first layer, let it dry and then slightly slide the pins on a clean cardboard.

Make the second layer more saturated. Let dry.
The final layer will be coated with clear varnish.
Simple hairpin

Want to make a hairpin for your hair with satin ribbons? Then implement this idea. Very simple in execution, but at the same time a very effective hairpin is obtained from satin ribbons and beads. Tie a beautiful big bow on the ribbon. Now make a brooch. Cut a circle out of felt. Decorate it with large beads in the color of the ribbon or decorate a dense base with rhinestones. Now you need to connect the two parts of the product. Glue the blank to the barrette and the decoration will be ready.
Based on this idea, you can create different variations of the accessory. For example, make the central part of the bow on a contrast tape. You can embroider the canvas with beads or decorate it with embroidery or perforation.
Hairpin for kids
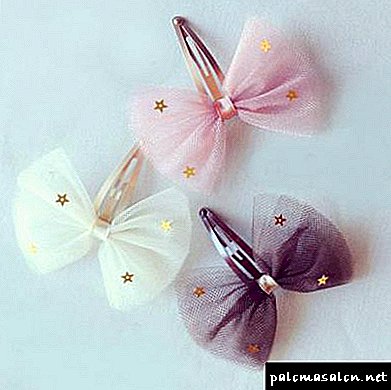
A child who goes to kindergarten often manages to lose or forget things there. Especially often girls lose hairpins if they decide to dissolve their hair during a quiet hour. Buying accessories for hair - a pleasure. Therefore, you can make beautiful hair clips with your own hands. As a basis, you can take the usual metal "crocodile". Find the right fabric. Fit thick satin ribbons, tulle, mesh or guipure. Cut a rectangle out of the prepared fabric. With the help of a needle, assemble the blank into an accordion and fasten it in the middle. Hide the thread with something decorative. For example, you can tighten a thin satin ribbon in the center or make a couple of turns with metal wire. Now you need to decorate the resulting bow. You can use a variety of accessories for creativity: beads, rhinestones, sequins, sequins. Fittings to the material is desirable to sew, not glue. But the bow itself will be attached to the base-crocodile with a hot gun.

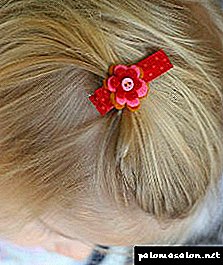
How to make a hairpin for your own hands? Decorate the existing, but already peeling base. To transform it beyond recognition, you will need acrylic paint and felt. Defat the base and then apply two coats of paint on it. To make the hairpin not one-color, you can decorate it with contrasting dots. While the blank will dry, you can make a decorative detail. Draw a freeform butterfly. But do not try to portray something complicated. Felt - a rough material, it will not turn out to cut something very fancy. It is possible to do with a primitive form. Now cut the pattern and transfer it to the fabric. You can make all butterflies one-color or create a gradient on a nuance. In the second case, you will need to pick up material that differs by several tones. Cut the butterflies and sew them in the middle. It remains to glue the decorative element on the barrette.
You can make very beautiful hair clips from foamiran with your own hands. Photo sample product attached above. How to repeat a similar beauty? You need to purchase sheets of material in four colors: pink, white and two shades of green. Before you get to work, you need to draw a pattern of flower petals and leaves. Cut out the patterns and translate them to the material. Now you need to cut the workpiece. Stretch the leaves of the rose so that they become wavy, and then, alternately heating each part on the iron, collect the half-open buds. According to this scheme, you need to create white flowers. When these blanks are created, you can begin to decorate the scallop. We degrease the workpiece and then attach the leaves to it with the help of a glue gun. We arrange the greens so that the two shades of green harmoniously complement each other, rather than create separate islands. When the leaves have taken their place, place the flowers. They can be glued to greenery, preheating on the iron.
Stylized flowers

This beautiful hair ornament can be made of wire and large beads. If you have any natural stones in your arsenal, you can use them. Before you start, you need to consider the concept of creating jewelry. Draw a sketch. Arrange several flowers side by side, and fill the space between them with pebbles placed at different heights. If you wish, you can form twigs of them. When the sketch is ready, you will need to make a foundation. Bend a piece of wire in half and twist on top. Repeat this process 5 times. As a result, you will have 6 teeth barrettes. They should be soldered to any metal plate. It is desirable for this purpose to use something decorative, for example, with engraving. But if there is nothing suitable, you can simply wrap the wire with a spring. We fasten cloves with the frame. Now proceed to the decorative part. Create a drawing on a pre-drawn sketch. You can string beads on one long wire or create elements in pieces. We collect decorative details into a single whole and attach to the base. If necessary, the wire can be soldered.
Satin ribbon bow
This is a classic version that will suit everyone and always, both for an adult woman and a little girl. It is possible to decorate hair with satin bows both daily for work and for special occasions - we select only the corresponding color and decor. So, options for creating bows with ribbons do it yourself:
Option One:
Option two:

Option three:

Option Four:
Option Five:
Option Six:
Decoration hairpins- "crocodile"
The usual metal hairpin- “crocodile” holds the hair well, but it looks pretty boring at the same time. Decorating such a hairpin is simple, and the result will delight any little fashionista!

So, how to make such a hairpin - step by step instructions:


Satin Ribbon Flower
This method of hair decoration involves a lot of options and techniques of creation. You can sew a hairpin with their own hands for themselves and for the child. Here are a few workshops:
Option One:
Option two:
Option three:
Option Four:

Option Five:
Option Six:
Option Seven:
Option Eight:
Clip barrette decor
As with the hairpin- "crocodile", the usual metal hair clip is easy to decorate with ordinary thin satin ribbons:


Option One:


Option two:
For a little princess you can add beads:


Scrunchy with their own hands
The most common type of hairpins and the most necessary. In the selection of workshops offered below, you will find step-by-step instructions not only on decorating an ordinary elastic band, but also on their independent sewing:
Option One:
Option two:
How to sew a gum for hair do it yourself:

Polymer clay hair accessories
Many beautiful decorations in the hair are made of polymer clay. Often - these are flowers from clay, which are fixed on the base (clamp, automatic hairpin, hairpin, gum). These accessories give charm and are able to transform everyday hairstyles into a festive and elegant styling.
A large assortment of similar models is on sale, but you can make a clay hairpin with your own hands. Such a product will be unique and will bear the imprint of the personality of its own owner. It will take a little bit of time, desire, polymer clay, auxiliary tools and imagination to create such a trifle.
More on the necessary:
- polymer clay for baking,
- trowels and spatulas for clay,
- hairpin base
- blade,
- glue gun,
- example of the finished product.
Polymer clay can be bought at any store that sells products for needlework. It is sold in a large assortment of colors and in different packages.
Glue gun can be purchased there. In the event that the store does not have one, it is sold in any store of building materials and tools. In addition, it should be purchased immediately and rods for it.
Tip! In order not to spoil the purchased polymer clay, you can try to first fashion the desired from children's clay.
Directly the manufacturing process includes the following steps:
- Polymer clay is carefully kneaded and kneaded. If necessary, mix several colors.
- The desired components of the future decoration in the hair (flowers, leaves and others) are formed from the mashed polymer polymer.
- After the components of the barrette are formed, they are laid out on a baking sheet and sent to the oven - according to the instructions attached to the clay.
- After the clay is completely hardened, it is varnished in several layers. Each subsequent layer is applied only after the past has completely dried.
- When using a glue gun, the components are fixed in the desired order on a hairpin-based.
There are options when the barrette is completely made of clay, for example, a barrette of a plate and a wand in Japanese style, a comb or just a long hairpin. It is possible to decorate such decorations both exclusively with clay and other accessories:
- sparkles
- tapes
- beads,
- rhinestones and other accessories.
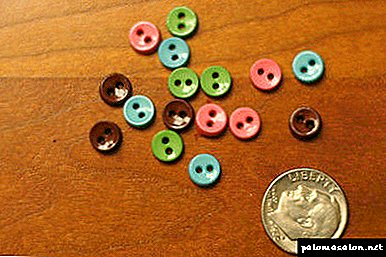
In addition, you can always create hairpins in the hair of what is at hand. There is no need to buy more clay or ribbons. You can use anything you want:
- scraps and unused lace cuts,
- old beads with a worn jersey,
- buttons,
- rhinestones from ancient jeans
Everything fits and is sure to come in handy. All you have to do is to enclose a bit of fantasy and fill it with enthusiasm.
Interesting! Nobody thinks that the old clip can be updated and get a unique decoration in the hair.
No woman can safely part with "unfit for anything" pieces, so that the search for materials for the masterpiece should not have any difficulties. This means that it is time to create your own image and be truly unique!
What needs to be prepared
Before you start work, you need to prepare (using the kanzashi technique):
- A wide ribbon of satin of any color (four to five centimeters wide, and about one and a half meters long)
- Material from satin of other contrasting colors (width two and a half centimeters, length - twenty five centimeters),
- Plain acrylic cabochon,
- Fasteners that will be used as a hairpin (hairpin or crab),
- Glue,
- Scissors,
- Candle or lighter,
- Pencil,
- Ruler,
- Thread,
- Needle,
- Tweezers.
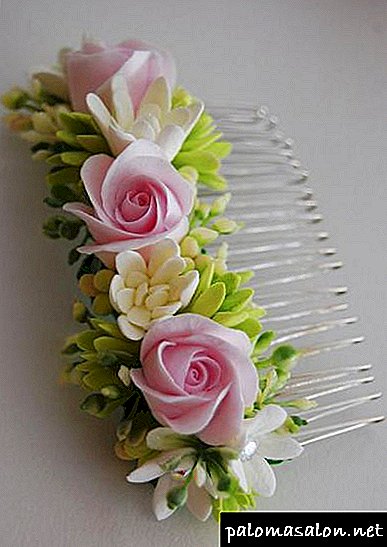
In the form of flowers
One of the simplest, but at the same time beautiful, is a product made from satin ribbons. For the manufacture of this you will only need to take:
 Material from satin main color, the width of which is five centimeters,
- A ribbon of some other color atlas of two and a half centimeters wide (the color may be the same, but with some pattern),
- Needle with thread
- Little bright bead,
- Mount in the form of automatic hairpins,
- Scissors,
- Glue.
 Material from satin main color, the width of which is five centimeters,
If you have all this, you can proceed to the implementation of the product.
Step-by-step instruction:
 First take the primary color material. and cut it into seven centimeters long pieces,
- After that, fold each of the resulting strips at an angle of ninety degrees in this way.so that the distance from the edge to the corner does not differ,
- String the finished petal on the thread with a needle,
- Do the same for the next four petals. The result of this manipulation will be a flower
- Similar actions need to be done with the material of the primary color., only the flower should come out bigger,
- Secure the flower on the cooked base. It's easy - just fit a cardboard circle with the same color material.
- Then make a different type of petals. To do this, take a ribbon with a pattern and cut it into strips five centimeters long. The result will be five parts. Using a soldering iron and a ruler, solder a corner, if you do not have a tool, just sew it. Next, the excess tissue is cut, the main thing is to prevent the rest of the fabric from being tight,
- The blank is folded along the inside out. The cut angle should be sharp, the greater its sharpness, the smoother the bends of the final petal,
- Petal need to straighten, and bend the corners to the middle. The edge is fused with a lighter or soldering iron,
- There should be six petalswhich are stitched together in bundles of three,
- As soon as each of their parts is ready, start making out the product. Glue the flower of the largest size and the smaller one on the center. It is necessary to fix it so that the petals from the upper part are located between the petals of the element located below. In the middle of a smaller flower a bead is glued. The end is the mounting side pointy petals. That's all, now this product can decorate your hair!
 First take the primary color material. and cut it into seven centimeters long pieces,
 Step-by-step instructions for making handmade hairpins of ribbons
In the form of a bow
An interesting option are the bows of rapeseed.
The rapeseed ribbon has an original structure that gives the final product a certain showiness. From this material make flowers, bows and much more. Its main advantage is density, such decoration will not crumble before our eyes. The hairpin made of rape perfectly preserves the original shape.
Option number 1. Required materials:
- Rapeseed material (length 10 and 22 millimeters), their color should be different,
- Scissors,
- Lighter,
- Transparent thin fishing line,
- Needle,
- Mount
- Glue,
- Capacity for garbage.
Step-by-step instruction:
- Pick a material by color. To do this, make a template bow, attaching blanks to each other. The length of the workpiece is influenced solely by the type of bow — short or long;
- When the first step is done, cut the wide ribbon, not forgetting about a stock of about two millimeters, as well as firing the edges,
- Next, the tips of the workpiece connected and using fishing line and needles,
- The thread is attached to the center. and is wrapped several times so that a bow is formed, which will become the basis,
- Next you need to take a second tape, the width of which is ten millimeters, and wrap it over the base. After establishing the required length with a margin of two millimeters, the rest is removed.
- Ribbon sewn to the bowdrag in the center
- It remains elementary - hide all sorts of seams and thread a piece of solid material of the desired length, attached by threads. If you want, you can fasten a button in the middle or stick a strazik on it,
- Prepare a hairpin directly. Trim it with satin, glue the bow, and the decoration is ready!
Option number 2. Materials:
- Red, white and blue rapeseed material,
- Barrette,
- Beads,
- Lighter,
- Glue gun,
- Needle,
- A thread,
- Scissors.
Step-by-step instruction:
- Cut four centimeters from white tape, from red - three, and from blue - two, burn the edges with a lighter,
- Bend a piece of blue and then red.Having enclosed a smaller blank into it, then bend the white one, having enclosed in it the two previous elements,
- Where all the blanks are connected to each other, using a needle and thread, grab the edges of each element. Similarly, make eight more petals, then join them together in the right places, and glue to the middle a circle made of tape,
- On the back of the flower glue the pin itself, and decorate the flower and its center with beads.
 The rapeseed ribbon has an original structure that gives the final product a certain showiness.
Kanzashi technique
Kanzashi is a very popular Chinese and Japanese hair accessory. Today, this product is very fond of the bride, as well as people whose work features relate to the use of kimono. In our country, ladies use such jewelry in everyday life, and shops have a truly wide range of similar hairpins. But buying them is not necessary!
To make such a thing, you will need:
 Tape,
Tape,- Tweezers,
- Pins,
- Scissors,
- Candle,
- Needle,
- A thread,
- Glue,
- Basis for fastening
- Beads as a design element.
 Tape,
Tape,Step-by-step instruction:
- Cut from the material the required number of squares., each bend twice, then two more times in half,
- Cut corners and singe, it is not necessary to do this, but in this case the angle will come out too high,
- Similarly, make as many petals, as required, then thread them together or with glue,
- Decorate a flower in the middle with rhinestones, beads or buttons, connect with the base and here is a stylish and original decoration for your hair ready!
 Kanzashi is a very popular Chinese and Japanese hair accessory.