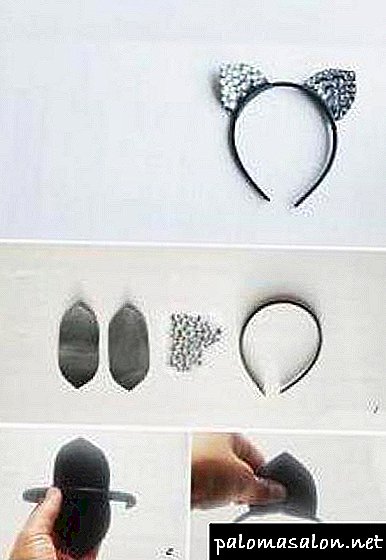
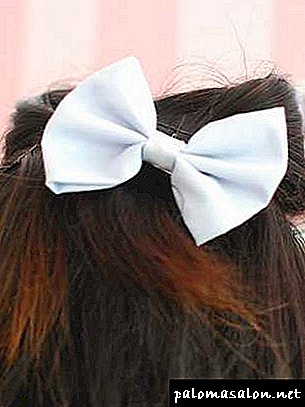
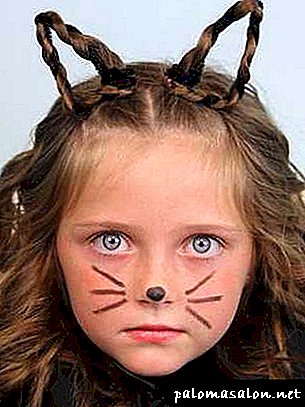
Since you are just an accessory, it can be different from what real ears look like. On a fun evening event you should shine! So, how to make a “Cat Ears” bezel with your hands to a disco? It will take:
- Simple black bezel.
- The cloth.
- Cardboard.
- Scissors.
- Rhinestones or shiny sequins.
- Black thread.
What do we have to do:
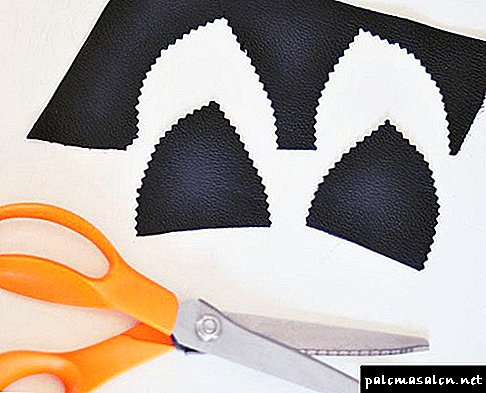
- Draw and cut two ears on the cardboard.
- Fold the fabric in half and attach the template to the fold, cut.
- Insert the bezel in the center of the cut piece. Sew the ears at the circumference of the bezel.
- Cardboard templates make a little less, cutting off the edges by about 2 millimeters.
- Insert one template between the two sides of the ear. Sew the eyelet on the edge.
- Do the same with the other eye.
- Now attach stones or sequins to the accessory.
Bright accessory for the evening event is ready!
There are few people who can walk in the bezel all day. This accessory can press on the head after a while and cause inconvenience. Therefore it is worth knowing how to make cat ears with your hands without a rim. What you need for this:
- Scissors.
- Cardboard sheet.
- Threads.
- Felt.
- Simple hairpins.
- Glue gun or moment glue.
- Draw 2 eyelet patterns on a thick cardboard, cut out.
- Cut out the details of the felt from the templates.
- Trim the patterns around the edges. Insert them between the parts of the fabric, sew the ears.
- Smear glue the bottom of the ear and stick to the barrette.
- To make your ears less boring, experiment with flowers and decorations. You can sew around the edge of the accessory ribbon, attach rhinestones, sequins, pompons, sew bows at the base.
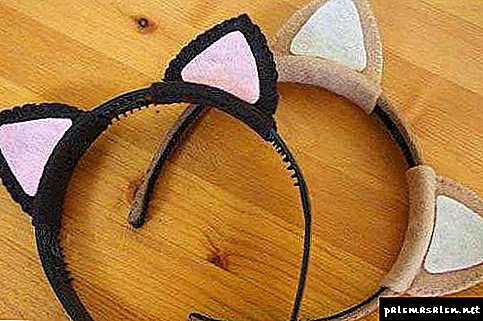
Fur ears
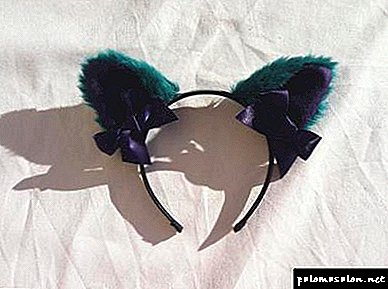
How to make cat ears with your hands as similar to the real ones? What you need for this:
- Draw and cut the template on the cardboard.
- Attach it to the fur and cut 4 parts.
- Sew the parts together in pairs.
- Cut out a new template from the cardboard for the inside of the ear.
- Attach it to the felt and cut 2 parts.
- Felt sew to fur.
- Glue each eyelet to the rim.
- Tie two bows of tape and glue them to the base of the ear.
This accessory is perfect for a stylized event!
Casual option
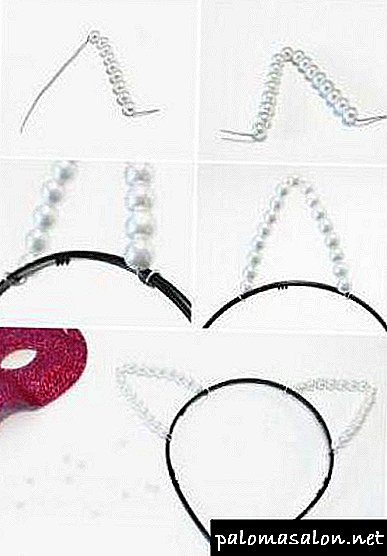
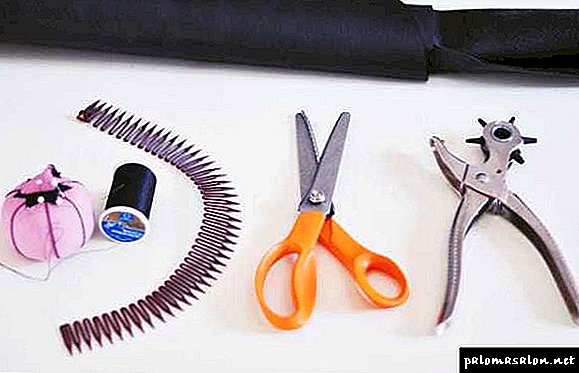
The casual version of this accessory should be more relaxed, it is suitable for any clothing. How to make cat ears with your own hands for everyday wear? Take:
- Thick wire.
- Narrow simple bezel.
- Pliers.
- Beads that could be strung on a wire.
What do we have to do:
- Cut the wire to a length of 6 centimeters longer than the ears should be.
- String one bead and bend the wire in half, shape the cat ears. Bead should be located in the center.
- String the remaining beads, not using 3 centimeters from each edge of the wire, bend them to the side (this part will be attached to the rim).
- Tie the ears to the rim.
How to make cat ears with your hands a little different way?
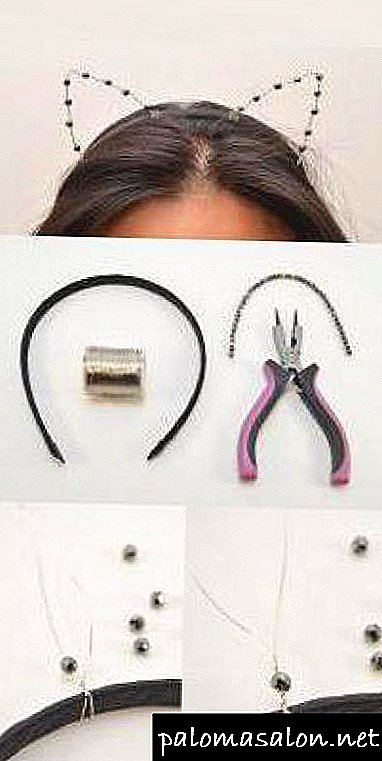
- Take two wires and tie to one place on the bezel.
- Put one bead on one end, twist both ends together.
- Put on another bead and twist it again. Continue to do so until you create the desired length of one half of the ear.
- Bend the wire, give the desired shape and continue to do the second half on the same principle.
- When finished, cut the wire, leaving 3 centimeters to attach to the rim.
- One eyelet is ready, make the second one in the same way.
Wear it with pleasure!
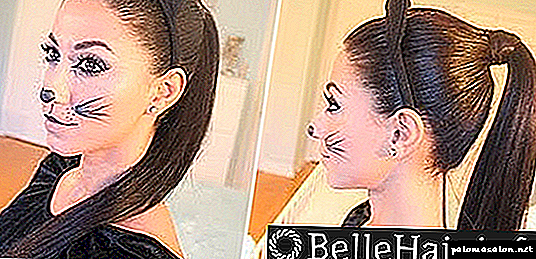
You've learned how to make cat ears with your own hands. The photo shows in detail how to do it correctly.
Cat ears - it's easy, 3 ways to make a funny hairstyle yourself
The author Veronika and Vlad Date May 17, 2016
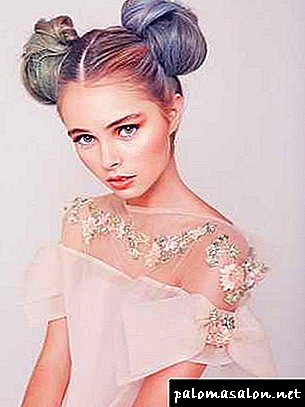
Women strive to be not only beautiful, but also not boring. Therefore, the most courageous representatives of the beautiful half of humanity are constantly coming up with new unusual hairstyles. One of the ways to give your own look charm and uniqueness is to make “cat ears” out of the hair using the method proposed below.
Such styling does not require sophisticated tools and special hairdressing skills, but looks cute and charming. Are you already burning with impatience, try your hand and amaze others in your creative way? Well, step by step instructions make it easier for you.
Preparatory stage
If you have a mischievous mood or you have been invited to a theme party, the carnival is near - it's time to try on a feline image. You, of course, understand that you should not go to a business meeting in this form, even if the animal ears have the strictest appearance.
For the youngest lady, such a hairstyle is a real find.
Where to go with the hair cat ears
It will be appropriate everywhere:
- to meet guests
- on a walk,
- in kindergarten,
- at the matinee.
Another advantage of non-trivial styling is that it is easy to do it yourself or with the help of a mother, a friend, or a neighbor (in general, not professionals).
Thus, the preparatory stage consists in the search for the necessary materials and the choice of the contractor.
Method one: ears on elastic bands
The formation of the lugs is a simple process, regardless of the length of the curls.
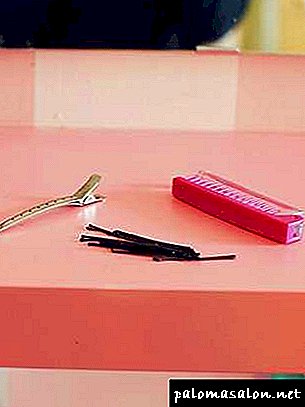
To create a hairstyle, we need:
Tip: hairpins should be chosen according to the hair color, for blondes - light, for brown-haired women and brunettes - dark.
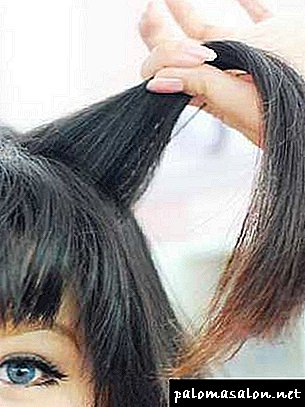
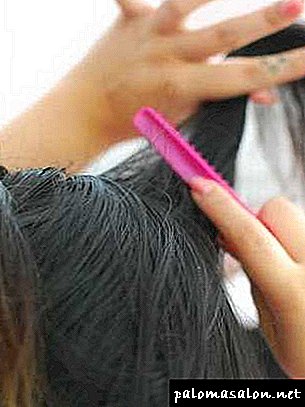
- Carefully comb hair (they should be without the slightest confusion).
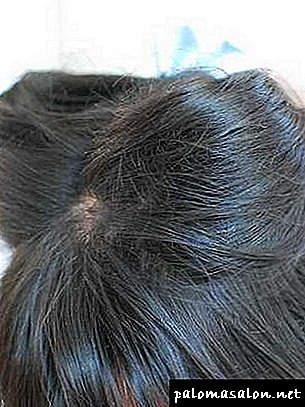
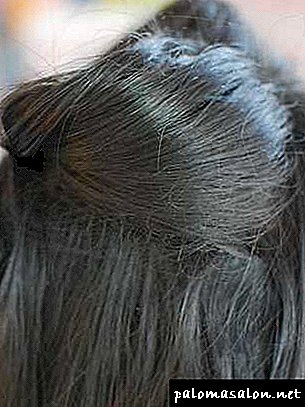
- Divide the hair in half into a straight vertical parting.
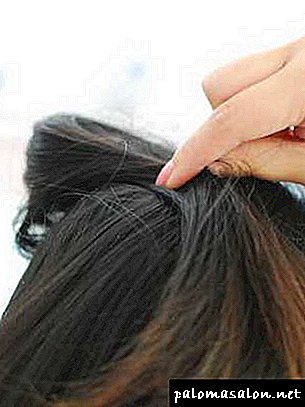
- In the upper part of the head, select strands of the desired size (you can leave some of the curls free or pick up all the hairs in the styling). Making the same symmetrical tails with tight elastic bands.
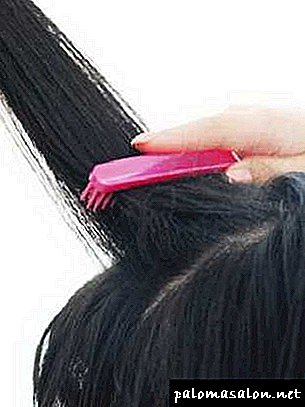
- Now with the fingers of the right hand we create a twisted strand from the right tail.
- From the prepared strand we form a small loop near the elastic band and wind the rest of the hair flagellum around the loop as close as possible to the base of the tail. We support the loop with his left hand.
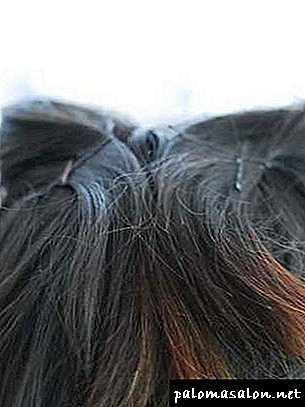
- We fasten the obtained capsule with pins, starting from the end of the flagellum. Then insert the required number of studs from different sides, giving the dough strength and neatness.
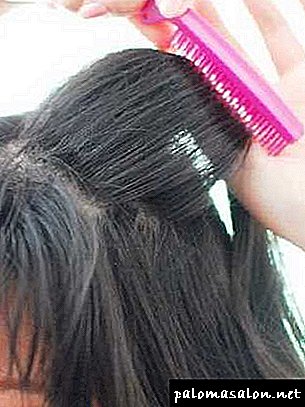
- Repeat steps 4, 5 and 6 with your left hand with a left tail.
- We process styling with varnish, at the same time smoothing fingers with protruding hairs.
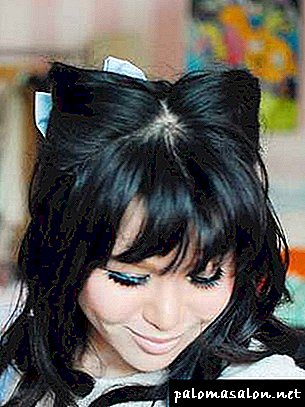
- The result - two cute "ears." Hair is ready!
Remarks on the topic:
- harnesses should be wound at the very bases near the rubber bands, and not at the ends or in the middle,
- if you can’t get the desired result the first time, you need to unwind the strands and repeat the winding from the very beginning,
- You can give the jug the desired specific shape, crushing it with your fingers.
Fluffy cat ears from the hair - the second way
There is a variant of laying, in which fluffy ears of a cat are obtained. This method allows you to make a more strict styling. We will need:
- Comb for combing strands,
- Barely visible hairpins,
- Means for fixing hair.
- We comb the hair and divide it by a vertical parting in half.
- Select the curls on the crown to form the ears of the desired size. For convenience, they can be fixed with clips. Separate strands (or bangs) forward on the forehead.
- One curl is divided into three strands. Every strand you need to comb. Then we merge them and form a voluminous strand, which should be additionally combed.
- Fold back combed curl back and turn out, forming the eyelet. We fasten with a hairpin (or stealth) at the very base.
- Repeat steps 3 and 4 on the other side of the hair.
- If the free curls near the face are not needed, we place them back between the ears, combining all the hairs in one strand. We fix invisible on top.
- So, hairstyle ears out of the hair is ready!
Cat ears do not have enough hair length - we make an accessory from scrap materials with our own hands using a bezel
A short haircut does not allow you to twist the tails, but at the carnival you want to be a kitty? There is a way - we make removable ears on the hoop.
Description of the manufacturing process:
- We draw and cut out the pattern of the ear (you can directly on the cardboard).
- Cut out the four parts, putting the prepared pattern on the fabric folded in half face down.
- We sew in pairs prepared elements. You can use a sewing machine or do without it.
- We turn out the received ears. We insert it inside the carton (in the case of fur, you can do without cardboard inserts).
- Glue the tip of the tape to the end of the rim and wrap the whole hoop with the tape, winding the ribbon in a vertical spiral. Secure with glue on the other end of the rim.
- Sew ears to the rim.
- Accessory ready!
How to make a haircut: we produce a headband with ears
Remarks on the topic:
- if each eye has an asymmetrical shape, attention should be paid to their symmetrical arrangement on the bezel,
- for the front side of the ears, you can take a fabric that is different in color from the main matter (for example, pink, light gray, beige),
- if the selected fabric is thin enough, you can not sew the ears, and glue them to the rim, making a small hem on the base of the details.
Now you know how to make ears from hair and other convenient materials. And to supplement the image of a cat can be appropriate makeup.
All materials are provided for review. Before using recommendations concerning the health of your hair, we recommend that you consult with a specialist. Use of material is permitted only with the active hyperlink to the site.
How to make ears out of hair. Step-by-step hairstyle cat ears
Step by step hairstyle
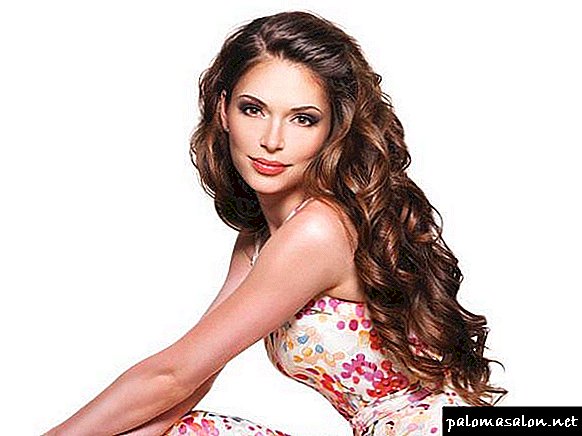
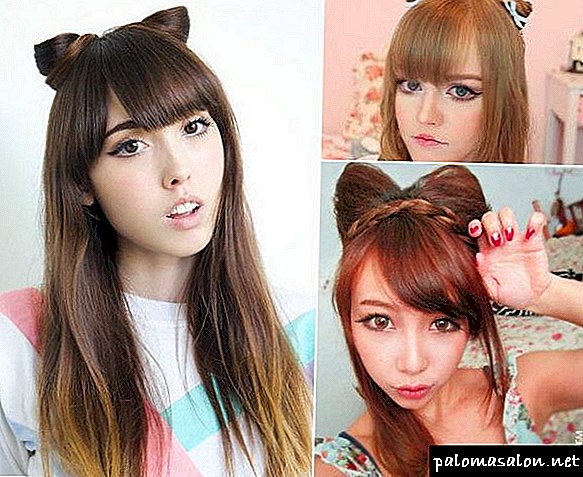
"Cat ears" of the hair - it is very cute, feminine, playful, unusual and original female hairstyle. This extraordinarily cute and mischievous hairstyle is suitable for almost any event: for a party, a date, a walk, a trip to the university, school or just shopping. Hair "cat ears" of the hair is good because the hair in it is collected, do not interfere, do not get dirty and do not get confused, it is a great solution on a hot summer day. "Ears" of the hair give the female image a peculiar charm, uniqueness and playfulness.
Hair "cat ears" of the hair will suit long-haired girls, as well as girls with medium length hair.
Below is a detailed step by step description of the hairstyle. If you make "cat ears" out of your hair for the first time and you have something wrong, do not despair, a little perseverance and you will definitely succeed!
What do we need?
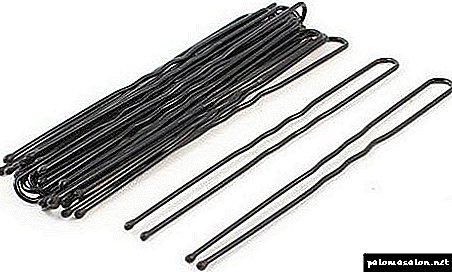
- 20 ordinary hairpins, 10 hairpins for each “ear”. It is advisable to select hairpins by hair color: blond for blondes, black for brunettes.
- 2 tight gum, preferably also the same hair color.
- Hair spray medium fixation
Step by step hairstyle
1. To begin with, carefully comb your hair so that there are no tangles.
2. Make an equal, straight parting in the middle of the head.
3. With the help of our rubber bands we make 2 identical tails on the sides in the upper part of the head, at the same distance from the parting.
4. If you have unruly hair (or, for example, are too smooth and slippery), apply hair foam over the entire length of the tails.
5. Next, choose what kind of “eye” you will do first: right or left.
6. Suppose we begin to make an “ear” on the left side - then point the index finger of your left hand perpendicular to the head (with your fingernail down) and press it tightly against the elastic band.
7. With your free right hand, begin to twist the tail around your finger pressed to the elastic band. The important point: wind the hair strictly at the base (at the gum), not on top and not in the middle.
8. You should have a bundle resembling an ear. Do not remove your index finger, otherwise your “ear” will fall apart. If the first time you did not manage to twist your hair (and if you are a beginner, then it will most likely be so), then dissolve the bundle and wind it again until you achieve the desired result.
9. With the middle finger of your left hand, hold the end of the tail, and with your free right hand, insert one pin into the tip of our tail, as if attaching it to our bundle.
10. Take another 2 studs and securely fix the same tip near the first stud. The index finger is still in the center of the formed “ear”.
11. Take 2 more pins and stick them on top (pointing down, perpendicular to the head) on both sides of the index (left) finger, so one of the teeth of the pin enters the central hole (which formed the index finger) and the other tooth enters the beam.
12. Take another pin and pry the strand of the beam (at the base of the head) and fasten it with the hair tightly gathered on the head. Another pin do the same from the opposite side of our beam. This is done to ensure that the lower hair “ear” does not crawl up and did not seem to gum.
13. If the studs were too long and look out of the beam, they can be shortened with pliers or pliers.
14. With the remaining 3 studs, attach the loose strands to the “ear” and give the “eyelet” a neat look. We remove the index finger.
15. Sprinkle the formed “eye” with varnish and at the same time smooth the hairs along the twist. You can slightly mash the ear with your hands to give it a volume and a beautiful shape.
16. In the same way we form the right “ear”.
17. Smile at yourself in the mirror and wink =) You are great!
This hairstyle also looks great with loose hair, with only part of the hair going in ponytails, and the rest remain loose.
Hairstyle "ears of hair": photo and step by step scheme
Love the unusual styling? Then the “ears” hairstyle, which is slightly eccentric and has its own charm, will appeal to you. Despite the fact that the styling has a frankly teenager and even children's styling, she has earned popularity among older women of fashion.
Such "ears" can become part of a more complex styling, and can - in combination with loose curls remain the only, but original decoration. There are a lot of their styles in today's popular trends, but at the base of the technique of their creation are the same tricks, let's see how to make a cat-like hairstyle out of medium-length hair.
How to make a hairstyle in the form of cat ears for a girl
This styling is quite simple in execution, but it is still worth practicing in its creation - from the first time neat "ears" may not work. To make the hair-lashing hairstyle as a true professional, no special hairdressing tools are needed, just an ordinary hair brush and a comb with frequent teeth, two wide and dense elastic bands - the more voluminous they are, the more your “ears” will be.
You will also need a strong hold hairspray and a set of ordinary hairpins that are precisely matched to the hair color as well as gum.
Hairstyle in the form of "ears" looks great as curly, and absolutely straight hair of any thickness, but like any smooth styling, it is best done from plastic, obedient curls. Therefore, after washing your hair, be sure to use an air conditioner or a balm, and especially unruly curls - thin or too fluffy, additionally treat with a small amount of mousse and foam, suitable for the type of your curls.
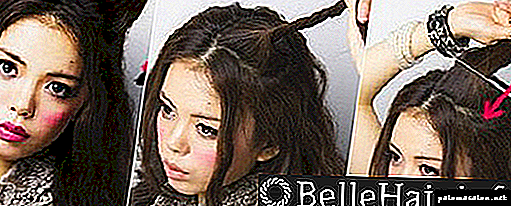
Carefully comb your hair and divide it into parting with a comb - you can make a classic straight, and you can zigzag, but always strictly in the center of the crown.Separate two identical strands from the parting on the top of the head and fix the two absolutely symmetrical tails and turn the ears one by one. To do this, twist the tail with your fingers into a bundle 5-7 centimeters long from the base and fold it with a triangle. Secure the “eyelet” with the help of studs, bringing them as close as possible to the base of the tail. Wrap the remaining length of the free strand several times around the elastic band, securing each turn with the help of hairpins. Do not tighten the strands too tight, trying to keep the amount of styling.
"Cat ears" need a little sharpen, for this fingers straighten the strand, giving it the desired shape. Make sure that the resulting styling is perfectly symmetrical and both ears are the same size. If the result suits you, fix it with a strong hold lacquer.
Such styling can be decorated stylishly with the help of a pair of identical hairpins or ribbons, or it can be decorated with a pair of live or artificial flowers.
Doing hair "ears" on long hair is not necessary to take in the styling the entire length and volume of the strands, the ends of the strands can be left free, firing them back or side. But to think about how to pack the rest of the volume of long hair is definitely worth it, with such original and slightly eccentric “ears” informal daily styling combines perfectly, for which it is enough to roll the ends of the hair with a hair dryer.
And you can stylishly use these extravagant elements for more complex styling, for example, gathering the entire volume of curls into a beautiful high beam of complex shape, or a loose tail, braid curls into a complex design of the French braid.

Of course, such styling should not be done for official images, but for informal daytime and even evening images, they can be a very effective and fashionable addition.
Such as in the photo hairstyle "cat ears from the hair" will tell you new ideas for your own image:


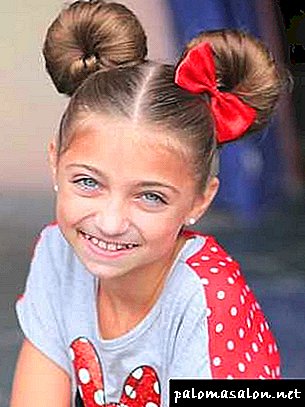
When making hairstyles like cat ears for a girl, it is worth remembering that children's hair is much softer than adults, and you should not expose them to too serious loads. So, you should immediately exclude the use of too tight elastic bands and hairpins, and, especially, strong “adult” styling. But this simple styling looks so beautiful on very young fashionistas that you should not ignore it.
It can be used as a holiday, decorated with bows or hairpins as well as everyday, putting in order long and flowing curls.
To get beautiful ears, and at the same time not to harm children's hair, you will resort to simple tricks. Use thick hair bands in textile braid and plastic colored hair clips instead of hairpins. In a children's hairstyle multi-colored while safe plastic hairpins will look organic as an element of decor.
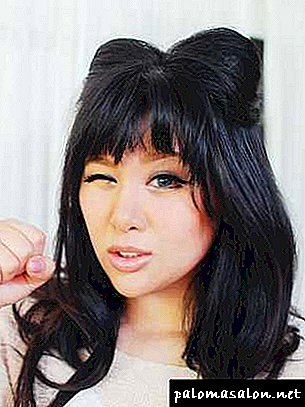
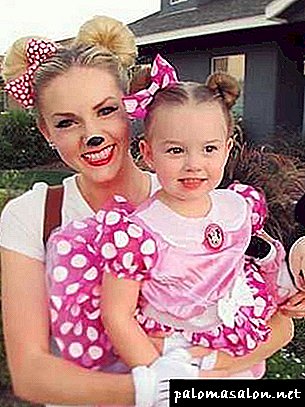
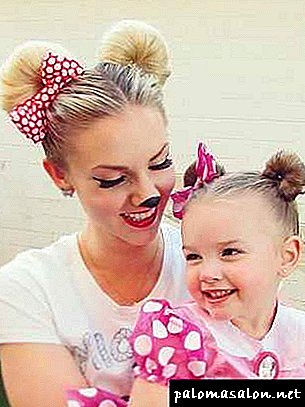
Haircut "Mickey Mouse ears" do it yourself
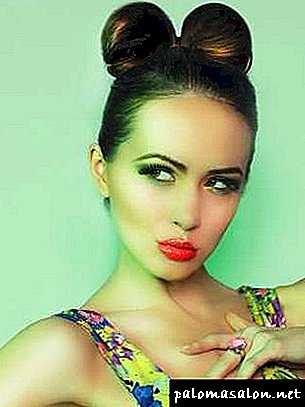
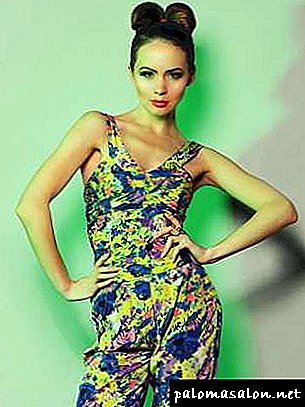
There is another kind of styling that fashionistas of all ages like so much - “Mickey Mouse ears”, how to make such a haircut? As you know, the famous cartoon hero Walt Disney was famous for its large and round ears. To create such a package you need the same rubber bands and hairpins - the secret of its design is in the technique of its execution.
The only caveat - if the "cat ears" look good on both straight and wavy hair, then this style will look perfectly perfectly straight, smooth and straight strands. If desired, the hair can be further straightened with an ironing device, stepping back from the roots of 10-15 centimeters. This hairstyle "ears of hair" step by step is performed in the same way as described above.
Washed hair should be treated with a conditioner or a balm to give it plasticity. Curls must also be thoroughly dried and combed, dividing into a straight and even parting. In such a style, you can “start”, as part of the hair on the crown, leaving the main array free, and gather all the hair in a high and smooth style. Collect the divided strands in two tails, and make sure that they are absolutely symmetrical. Use a brush at the base of the tail to make a light fleece, leaving the ends of the strands completely smooth.
Form a loop from the tail with a rubber band, leaving a minimum length at the end of the strands. Deploy the loop and straighten it as a cushion that resembles funny cartoon ears. Additionally, secure the installation of the studs around the entire contour and, if necessary, fix it with varnish.
Such as in the photo hairstyle ears out of the hair can be easily done with your own hands:

A beautiful haircut "Mickey Mouse ears" of medium-length hair can be made with the help of two small twister pins - they will add the required volume. To do this, decorated with a strand of tails, you must carefully comb and twist them into a neat rollers movement from the back of the head to the forehead.

The resulting "ears" - the rollers gently straighten, hiding the edges of the barrette and the ends of the strands in the styling. "Twister" allows you to work with the shape of the roller, you can make it flat, rounded or pointed. Laying can be further treated with lacquer medium fixation and decorated, securing the hairpin in the center of the resulting roller. Disney style is best supported by paired or single red hairpins-bows with large white polka dots.
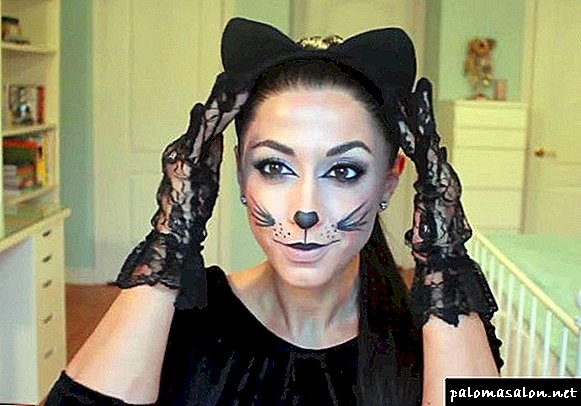
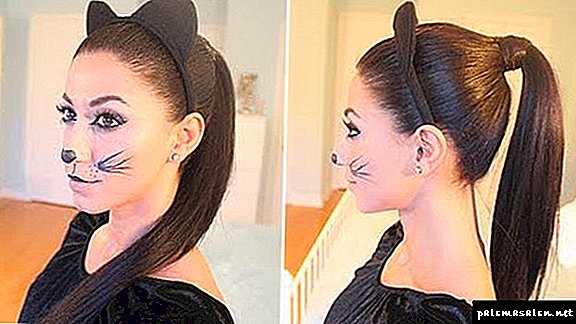
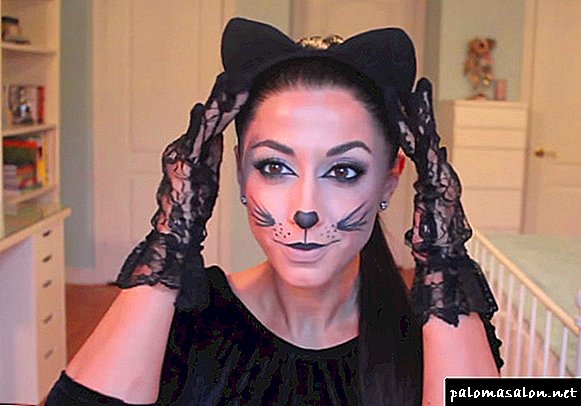
How to make cat ears do it yourself: step by step instructions and recommendations
Cat ears are an indispensable part of some costumes for a carnival, children's matinee or adult theme party. Modern stores provide a wide range of costumes. However, in some cases it becomes necessary to make cat ears with your own hands. In this article we will consider in detail the process of their manufacture.
Why do we need homemade ears?
Before proceeding directly to the practice, let's figure out why you might need a homemade accessory.
Self-made cat ears are a great option for any children's holiday. They can be made from colored paper or cardboard in order to save. After all, children, because of their age, quickly lose interest in things, may lose them or get dirty. The paper version will not be a pity to throw it away or spoil it. Even such ears are good for a family photo shoot.
In addition, their production will be a real pleasure for those who want to express themselves through creativity. A playful accessory made with your own hands is a unique thing that will give a lot of joy to its owner.
For some costumes, especially the author or thematic, it is difficult to find ready-made cat ears. With a little effort and turning on the fantasy, you can create an original accessory that is in harmony with the whole look. The ears made of the same material as the entire costume will look especially beneficial.
What materials need to be prepared?
Before proceeding to the manufacture of ears, you need to prepare materials that will be required in the process. The most common hair band is most often taken as the base. It should fit perfectly in size - do not press and do not press. The bezel can be left “in its original form”, covered with paint, cloth or fur. To make classic ears, you also need the following materials and tools:
- artificial or genuine leather,
- durable thread in the skin,
- plain or crimped scissors,
- sewing needle.
What other materials can you use?
In addition to the skin, you can use a variety of scrap materials. The most popular options are:
Standard bezel acting as a base can be replaced
- cloth tape
- paper tape
- wire wrapped in foam rubber
- durable thread
- clothesline gum.
How to create a spectacular image with cat ears?
Alone cat ears hardly help create a spectacular image. They, in fact, are its foundation. You can add an image using
- suitable clothes
- gloves, imitating cat's paws,
- any shoes "in the theme", for example, ready-made slippers in the form of feet,
- masks with cat faces,
- cat's tail.
We do hair. Step by step description
Hairstyle ears from the hair is perfect for different situations (not counting, of course, serious business meetings):
- aimed at a specific party theme,
- carnival,
- just if you want to play a little.

More stringent styling option
Direct attention. For little girls styling will generally be irreplaceable.
It is suitable for walking, and for going to kindergarten, and for receiving guests.
In general, it will be appropriate always and everywhere, without exception.
Preparation of materials
Make this hairstyle just with your own hands, without recruiting a master or help:
Laying is simple to do as from curls of medium length, and long - in any case, the formation of the ears will be an easy process.
The main thing - to prepare the studs, they can be purchased at any cosmetics store. Cost - a penny. Before we talk about the features of the creation of hairstyles, let's answer the most common questions about heels.
You will need the most ordinary studs
- for blondes - bright,
- for brunettes - dark.
Sequencing
Making such ears is not as difficult as it may seem at first:
- comb your hair hard to get rid of tangles,
- part on the hair,
- in the upper part of the hairstyle, make uniform, symmetrical tails,
- tails must be secured with tight rubber bands.
More examples of cat ears
This is a preliminary step, which is really quite simple, but then you need to be very careful not to make mistakes:
- use the same hand from which you have the tail on your head,
- point the index finger strictly perpendicularly and press as close as possible to the elastic band,
- Wrap the tail of the hair around this finger with the 2nd hand,
- maybe from the first time you will not be able to achieve the result - unwind the strands and repeat again, do so until you can curl the curls,
- for all this, pay attention that the tail should be twisted strictly near the base, and not at the top and not in the middle.
You should have had a typical nugget - do not rush to remove a finger from it, otherwise it will fall apart.
- hold the end of the tail with your middle finger
- with a free hand, fix the nugget with the pins - first stick it into the tip of the hair, and later take a couple more pieces and fix the tip of the tail a bit further from the first pin,
- the finger is still in the pod made
- 2 more hairpins fix the hair on the sides of the finger,
- lock the hair with the next 2 hairpins, as if you are poking the bean,
- With the remaining 3, fix the loose strands, thus giving the pot a great neatness.
An example of small cautious pods
Direct attention. This is not the only true way to insert studs.
You will be able to fix the bean and in its sole discretion.
The main thing is to ensure the reliability of the ear made.
At the end of the formation of the eyelet, you need to sprinkle it with a lacquer of the average level of fixation, immediately smoothing the hairs along the tail curl. If you wish, you can slightly mash the pods with your fingers to give it a certain shape.
All described actions repeat with the second tails. In the end, you will have two small, but very cute and attractive ears.
And if the hair is not long?
What if you are going to a costume party, you have a matching costume, but your hair is very short and does not allow you to shape your ears?

If the hair is not long - you can make ears of scrap materials
In this case, you can make them out of scrap materials.
Namely, you will be useful:
- ordinary headband,
- cardboard,
- tape.
Direct attention. The color of the tape and cardboard should match the desired color of your future ears.
Naturally, it is necessary to take into account that everything depends on the specific color of your hairstyle.
For example, it may be snow-white, dark, or reddish material.
But the bezel can be of any color, because it will still be covered with a decorative ribbon.
To create such artificial ears you need:
- prepare a tape of suitable length,
- Stick one end to the bezel and wait for the glue to dry,
- tightly wrap the tape around the bezel,
- when you reach the end, stick it on the other side so that it does not turn around.
Now you can start making ears:
- take the cardboard
- cut two ears to fit you
- the base of the ears should be slightly longer than the desired height of the ears, as they will be slightly buckled and glued under the bezel - the store should be about 2 cm,
- bend the ears and put them under the bezel,
- glue the part of the ears that you buckled,
- that's all - wait until the glue dries.
Ears made of cardboard and a hoop - a good device for carnival
In the end
Now you understand how to make a cat-like hair out of hair - this is a very unique hairstyle that is suitable not only for carnivals, but also for walking, meeting with friends or receiving guests at home. In particular, it will appreciate the girl with a mischievous character. Additional video in this article will help to better understand the basic principles of the creation of styling of the type described.
And if the hair is short?
What if you are going to a costume party, you have a matching costume, but your hair is too short and does not allow you to form your ears?
If the hair is short - you can make ears out of scrap materials.
In this case, you can make them out of scrap materials.
In particular, you will need:
- the usual headband
- cardboard,
- tape.
Note. The color of the tape and cardboard should match the desired color of your future ears.
Naturally, it is necessary to take into account that everything depends on the color of your hair.
For example, it can be white, black or red material.
But the bezel can be of any color, because it will still be covered with a decorative ribbon.
To create such artificial ears, you need:
- prepare the tape of the desired length,
- Glue one end to the bezel and wait until the glue dries,
- tightly wrap the tape around the bezel,
- when you reach the end, glue it on the other side so that it does not turn around.
Now you can start making ears:
- take the cardboard
- cut two ears of the size you need,
- the base of the ears should be slightly longer than the desired height of the ears, as they will slightly bend and stick under the bezel - the stock should be about two centimeters,
- bend the ears and put them under the bezel,
- glue the part of the ears that you buckled,
- that's all - wait until the glue dries.
Cardboard and hoop ears are a great accessory for carnival
Even if you have a short hair and you are going to a costume party, you have a chance to make a beautiful and unusual hairstyle with cat ears!
In conclusion
Now you know how to make a cat's hair out of hairs - this is a very original styling, which is suitable not only for carnivals, but also for walking, meeting with friends or receiving guests at home. Especially it will appreciate the girl with a mischievous character. Additional video in this article will help to better understand the basic principles of creating styles of the described type.
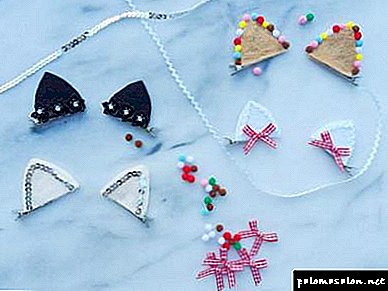
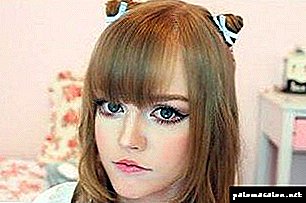
How to make cat ears on the bezel with your own hands?
This is a mythical god, which is represented in the form of a cat. The accessory complements the anime costumes. Volume ears fasten on a hoop or carry on hairpins.
You can make decoration at home from simple materials.
The work will require materials:
- Faux fur with a long nap.
- Fabric beige or pink shade.
- Thin wire.
- Nippers and bezel.
- Threads, scissors.
- Sintepon, cotton wool.
- For the basics you need to make a pattern ears. One part should be large (fur), the other smaller for the inner part of the ear (suede).
- Cut out blanks from fur and sew with threads. The wire must be flexible. The long section is divided into two parts by 22 cm. 10-11 cm is given to the height of one ear.
- The wire is bent to repeat the shape of the cat's eye. The fur detail is sewn to the suede blank from the reverse side.
- During stitching from the edge, 1 cm should be retreated. When they are ready, you need to turn it upside down, insert it inside with wire, fill it with padding polyester.
- Bottom remains open. Next you need to fold it in half, the ugly places are hiding inside. The bottom strip should bend around the bezel and sewn to the base.
Knitting pattern caps
For the spring and autumn season, you can knit a hat with needles for women.
Knitted product will attract the attention of others, because the knitted items on the needles, which are created with their own hands, are unique.
Spokes are selected individually to make the product dense and knocked down. Soft yarn does not fit, because the ears will not look beautiful on a hat. They may be in tone with a cap or different.
Knitters will be able to use the fantasy and not limited to the scheme. You can experiment, decorate a hat, combine several colors.
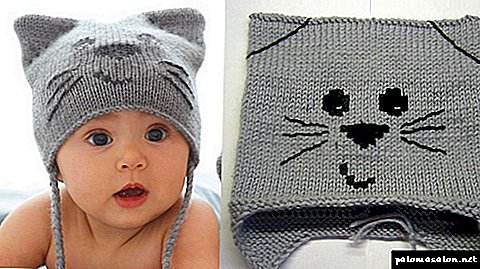
Knitting scheme with a description:
- Make measurements of the circumference of the head and calculate the required number of loops.
- Next, on the spokes, gain air loops and begin to knit a gum (English, French) about 5-10 cm.
- After the elastic, a flat cloth of 19-20 cm (depending on the depth of the cap) is knitted with facial or purl loops.
- Smooth fabric needs to be closed and stitched to make a rectangle.
- At the edges of the upper corners, 5 cm recedes and the ears are sewn diagonally.
This hat is simple to knit, it looks beautiful and unusual. Patterns of braids or diamonds on such a product is inappropriate.
How to make ears out of hair (36 photos): a simple method for creating hairstyles
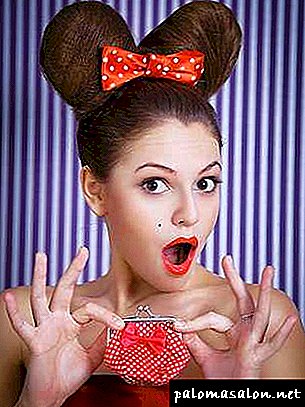
There are many unusual styling, which can give the image of a girl or woman a certain charm and originality. Among them - unusual, but incredibly cute "cat ears", forming in the upper part of the head of hair.
Today we will tell in detail how to make cat ears out of hair - detailed instructions will help you in the formation of styling. Even if you do not come out the first time, do not despair, but try again - and you will succeed in everything.
In the photo: cute and funny hair "cat ears"
First, try uploading your photo and see how this hairstyle will look at you.
Professional picking service for our subscribers absolutely free
Upload PC photo
Haircut "Mickey Mouse ears" of long hair: photos, how to make fashionable styling for girls
Love the unusual styling? Then the “ears” hairstyle, which is slightly eccentric and has its own charm, will appeal to you. Despite the fact that the styling has a frankly teenager and even children's styling, she has earned popularity among older women of fashion.
Such "ears" can become part of a more complex styling, and can - in combination with loose curls remain the only, but original decoration. There are a lot of their styles in today's popular trends, but at the base of the technique of their creation are the same tricks, let's see how to make a cat-like hairstyle out of medium-length hair.
Fluffy cat ears from the hair, the second method
There is a variant of laying, in which fluffy ears of a cat are obtained. This method allows you to make a more strict styling.
We will need:
- Comb for combing strands,
- Barely visible hairpins,
- Means for fixing hair.
- We comb the hair and divide it by a vertical parting in half.
- Select the curls on the crown to form the ears of the desired size. For convenience, they can be fixed with clips. Separate strands (or bangs) forward on the forehead.
- One curl is divided into three strands. Every strand you need to comb. Then we merge them and form a voluminous strand, which should be additionally combed.
- Fold back combed curl back and turn out, forming the eyelet. We fasten with a hairpin (or stealth) at the very base.
- Repeat steps 3 and 4 on the other side of the hair.
- If the free curls near the face are not needed, we place them back between the ears, combining all the hairs in one strand. We fix invisible on top.
- So, hairstyle ears out of the hair is ready!
Cat ears do not have enough hair length - we make an accessory from scrap materials with our own hands using a bezel
A short haircut does not allow you to twist the tails, but at the carnival you want to be a kitty? There is a way - we make removable ears on the hoop.
- headband
- cardboard or pattern paper, pencil,
- scissors, needle with thread,
- glue gun,
- tape (it is desirable to choose the color of the hair),
- a piece of soft fluffy material (fur can be).
Description of the manufacturing process:
- We draw and cut out the pattern of the ear (you can directly on the cardboard).
- Cut out the four parts, putting the prepared pattern on the fabric folded in half face down.
- We sew in pairs prepared elements. You can use a sewing machine or do without it.
- We turn out the received ears. We insert it inside the carton (in the case of fur, you can do without cardboard inserts).
- Glue the tip of the tape to the end of the rim and wrap the whole hoop with the tape, winding the ribbon in a vertical spiral. Secure with glue on the other end of the rim.
- Sew ears to the rim.
- Accessory ready!